As digital gives you the ability to instantly see the photo you have just taken, it also gives you the ability to instantly review your photo to check things like Exposure, what your Aperture or Shutter Speed setting was, sharpness or whether your composition was spot on.
Whereas film required you to write these settings down in a book when you took the image if you wanted to refer to them later, digital images actually embed all this data, plus a lot more, within the digital file itself making it very easy to review seconds, hours, days or years after you took the image. This is one of the most useful features in digital photography as you can look at an image that you like and see what settings you used in case you wanted to reproduce the image again.
All this stored data is called EXIF data and there are various ways that you can check it.
In Camera
First of all, when you are viewing your image on the back of your camera, there is likely to be a mode which shows you the image but also shows you a summary of the settings too as well as a histogram showing you the exposure of the image. You’ll see a lot of photographers checking these directly after taking a shot. This is known as Chimping. Whether it’s because of the position you assume that looks like a chimp or whether it’s the noises you make when you’ve got a good shot, I’m not so sure, but that’s the term that is commonly used amongst photographers.
Here you can see an example from the back of my camera, a Fuji X100S that I use for travel and street photography.
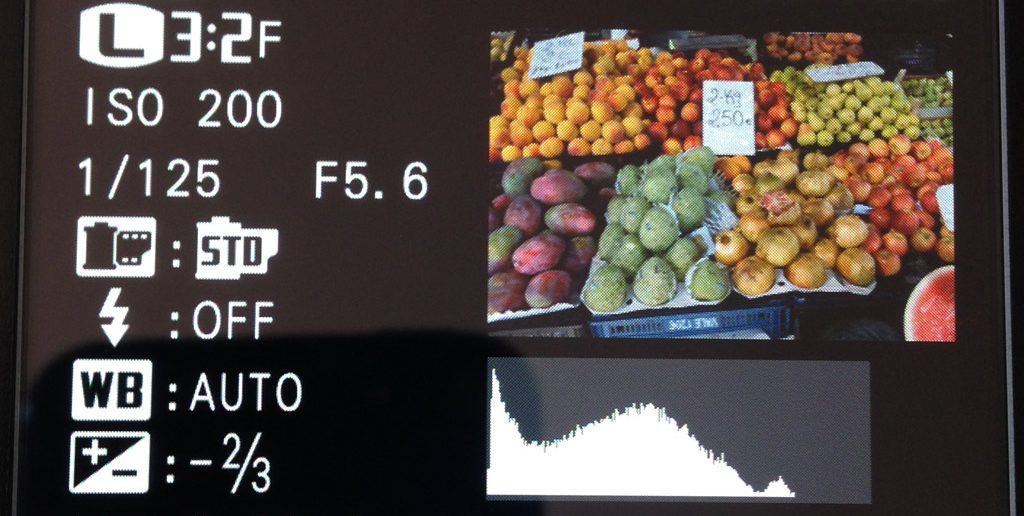
You can see lots of information about the shot in this view including the ISO value (200), the shutter speed (1/125) the aperture (F5.6) whether the flash fired (no), the white balance setting (Auto) and the amount of exposure compensation I was using (-2/3).
The other important part if the histogram which shows me whether I have got the exposure right. Normally you’d want the graph to start at the bottom left corner and finish at the bottom right corner, but in this case, as I was using some exposure compensation to under expose the image a little in the bright Spanish sun, you can see the graph ends before the bottom right. This means that I have under exposed the image a little too much and maybe just -1/3 would have been enough. A simple correction in Photoshop but one I should have got right in the camera first.
In Software
Depending on what software you are using to edit your photos, you will be able to access the EXIF data of the image. Each piece of software tends to get this information in a different way, but in a lot of cases look for the Image Information option in the menus or it might actually say EXIF Information of something similar. In software such as Adobe Lightroom you can actually filter through all your images based on the EXIF data, so if I was writing an article about taking photos with a high ISO setting, I could easily look for examples in my photo collection where the ISO was greater than say, 1600. A very useful feature.
So have a dig around in your photo editing software of choice and see if you can find where you get your image EXIF data from. Feel free to post the menu options in comments on this article so other photographers can benefit.